
Deploying a Microservice with ECS and Fargate
Deploying a Docker container on Amazon ECS can be straightforward, but getting permissions and traffic routed correctly can be challenging.
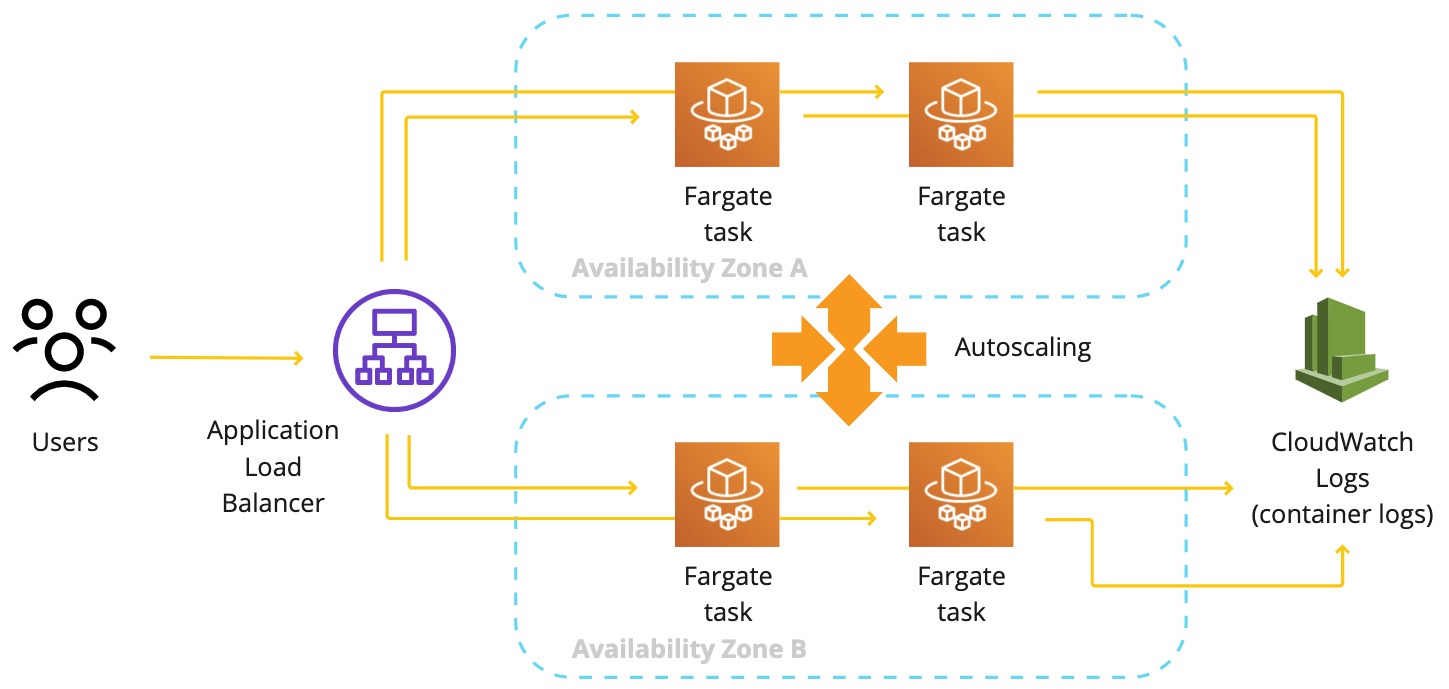
In this post, we will see how we can deploy a web application to ECS using Fargate. This is so we don’t have to worry about provisioning or maintaining EC2 instances. More importantly, we will see how we can set up the necessary permissions and route traffic to a highly available Microservice using an Application Load Balancer.
Amazon ECS
Amazon Elastic Container Service (Amazon ECS) is a fully managed container orchestration service that makes it easy for you to deploy, manage, and scale containerized applications. Fargate removes the need to manage the lifecycle of compute infrastructure and can be used to run containers without having to provision and manage EC2 instances.
Web Application
First, we need to create a Docker image for use on Amazon ECS.
We will use a Spring Boot Application and write a simple Dockerfile that uses a production-ready distribution of OpenJDK to run our application as an executable jar. Spring Boot uses an embedded servlet container accepting HTTP traffic on port 8080 by default.
1 |
|
During image build, our jar gets copied from the build directory to the image.
./gradlew clean test bootJar && docker build -t spring-boot-docker .
ECR repository
Amazon Elastic Container Registry (Amazon ECR) is an AWS managed container image registry service. Using the AWS CLI, we can authenticate our Docker client to the Amazon ECR registry to which we will push our image.
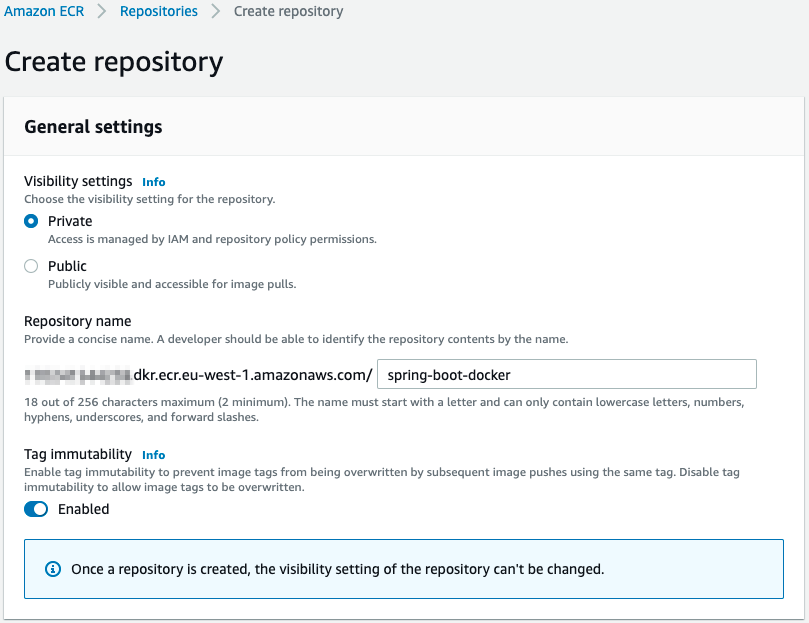
Create repository
Using the AWS Console, we will first create a new repository and enable Tag immutability to avoid image tags from being overwritten.
Once the repository is created, we can use the AWS CLI to authenticate to Docker.
aws ecr get-login-password --region REGION | docker login --username AWS --password-stdin ACCOUNT.dkr.ecr.REGION.amazonaws.com
Replace REGION and ACCOUNT with your AWS region and account id.
Push image to repository
We have created a new ECR repository and authenticated to Docker. We can now tag and push our image with the following commands.
docker tag spring-boot-docker:latest ACCOUNT.dkr.ecr.REGION.amazonaws.com/spring-boot-docker:1.0.0
docker push ACCOUNT.dkr.ecr.REGION.amazonaws.com/spring-boot-docker:1.0.0
Replace REGION and ACCOUNT with your AWS region and account id.
Fargate service
We will use CloudFormation to deploy our container to AWS Fargate as a service. This allows us to describe all of our infrastructure as code that can be kept alongside our project.
AWS CloudFormation lets you model, provision, and manage AWS and third-party resources by treating infrastructure as code.
Deploying a highly available service that can scale based on resource utilization can be achieved by placing our service in multiple AZs and using an autoscaling policy (e.g. to keep CPU utilization below a certain threshold). An Application Load Balancer is used to route HTTP traffic to our service. SSL is terminated at the load balancer, and security groups are created for the container and load balancer.
There are many examples online on how to structure all of our AWS resources and deploy them using CloudFormation. I found this CloudFormation template easy to use as it defines all resources in one template, but this can also be achieved by splitting them in multiple templates for reusability.
Resources
There are multiple AWS resources that need to be created in order for our service to be operational. We will need a new ECS cluster; the following is just an example CloudFormation template in YAML.
Resources:
  Cluster:
    Type: AWS::ECS::Cluster
    Properties:
      ClusterName: My ECS cluster
ECS Service
Next, we define our ECS Service that is responsible for running and maintaining the requested number of tasks. The following is just an example.
Resources:
  ...
  Service:
    Type: AWS::ECS::Service
    Properties:
      ServiceName: My ECS service
      Cluster: !Ref Cluster
      TaskDefinition: !Ref TaskDefinition
      ...
      DesiredCount: 2
      # This may need to be adjusted if the container takes a while to start up
      HealthCheckGracePeriodSeconds: 60
      LaunchType: FARGATE
      NetworkConfiguration:
        AwsvpcConfiguration:
          # change to DISABLED if you're using private subnets that have access to a NAT gateway
          AssignPublicIp: ENABLED
          Subnets:
            - !Ref SubnetA
            - !Ref SubnetB
          SecurityGroups:
            - !Ref ContainerSecurityGroup
The ECS Service network configuration defines the container subnets and security groups. Tasks running in our ECS Service are placed in 2 different subnets for increased availability. This means that if one AZ is out of service, traffic will be automatically redirected to the tasks running in the healthy AZ. We can of course specify more subnets depending on the regional VPC and subnet configuration on AWS.
Container security group
The container security group allows traffic on port 8080 only if the source has the LoadBalancerSecurityGroup attached. This blocks inbound traffic to our container except from the Load Balancer.
Resources:
  ...
  ContainerSecurityGroup:
    Type: AWS::EC2::SecurityGroup
    Properties:
      GroupDescription: Allows traffic on port 8080 only if the source has the LoadBalancerSecurityGroup attached.
      VpcId: !Ref VPC
      SecurityGroupIngress:
        - IpProtocol: tcp
          FromPort: 8080
          ToPort: 8080
          SourceSecurityGroupId: !Ref LoadBalancerSecurityGroup
Load Balancer
Our internet-facing Load Balancer accepts and forwards traffic to our container.
Resources:
  ...
  LoadBalancer:
    Type: AWS::ElasticLoadBalancingV2::LoadBalancer
    Properties:
      LoadBalancerAttributes:
        # this is the default, but is specified here in case it needs to be changed
        - Key: idle_timeout.timeout_seconds
          Value: 60
      Name: My ECS Service Load Balancer
      # "internal" is also an option
      Scheme: internet-facing
      SecurityGroups:
        - !Ref LoadBalancerSecurityGroup
      Subnets:
        - !Ref SubnetA
        - !Ref SubnetB
The Load Balancer security group is configured to accept HTTPS traffic from anywhere. An HTTPS listener and target group are also needed to forward traffic to our container. The listener requires a valid SSL certificate. In this example, this is not shown as the Certificate may be issued from any provider and, later imported to ACM (AWS Certificate Manager).
Resources:
  ...
  LoadBalancerSecurityGroup:
    Type: AWS::EC2::SecurityGroup
    Properties:
      GroupDescription: Allows HTTPS traffic from anywhere.
      VpcId: !Ref VPC
      SecurityGroupIngress:
        - IpProtocol: tcp
          FromPort: 443
          ToPort: 443
          CidrIp: 0.0.0.0/0
We have seen examples of how to create an ECS Cluster, ECS Service using Fargate, Load Balancer, and security groups.
Deploying the service
In order to deploy our CloudFormation template, we need:
- A domain name and hosted zone in Route53
- A VPC (with 2 or more subnets)
- An SSL certificate
Let’s put everything together in a CloudFormation template and use the AWS CLI to deploy our service. You will have to edit the deploy-params.json file and add all required parameters (vpc, subnets, certificate, etc).
aws cloudformation deploy \
  --template-file service.yml \
  --stack-name spring-boot-docker \
  --parameter-overrides file://deploy-params.json \
  --capabilities CAPABILITY_NAMED_IAM
All of our infrastructure should be provisioned within minutes, and we should have access to the Service using the A record created in Route53.
You can find the complete source of this guide on GitHub.
eof.
